
You are currently browsing the tag archive for the ‘UU flaming chalice’ tag.
During the weekly Sunday service on January 26, 2020 my church decided to do something a bit experimental. We were each given tiny baskets with the Unitarian Universalist flaming chalice on the side along with some small notecards.

We were instructed to either write or draw positive messages then place them in other people’s baskets. Here are the notes I did before I gave them away to other people.

In exchange I got a bunch of messages in my own basket written by my fellow church members. I got a great haul of notes. It’s so nice when other people care about you.

![]()
Last November my Unitarian Universalist church took part in the nationwide Transgender Day of Remembrance and Resilience. Here are some photos I took of that event.

The chalice, a symbol of the Unitarian Universalist faith, was lit at the beginning of the service.

Community minister Karen Lee Scrivo speaks about the transgender people who had lost their lives in 2019.

Rev. Rachel Christensen speaks at the podium.


Special music was played at this service.

Shantida speaks about her eventual coming out as a transgender woman.

Rob and Carol Boston speak on what it is like to be the parents of a transgender person.


Ebeth Porter sings during the service.

Lizzie speaks on being a transgender woman.

Eldritch lead a meditation.

Everyone was given a piece of paper that had the name of a transgender person who died in 2019. When that person’s name was called, the person who had the name would get up and place it on a table near a vase full of flowers.


![]()
Last week I finally mailed off my entry in The Brooklyn Art Library’s ongoing Sketchbook Project. The origins of that one can be traced to my involvement in last year’s Inktober 2019 (where the object is to create one new ink drawing then share it on social media evert day from October 1-31). One of my Facebook friends who is also my neighbor saw some of my work that I posted on that social media site and she messaged me with this tantalizing proposition. A few months ago she had decided to take part in The Sketchbook Project and she even sent away for the sketchbook, which also included a few ink pens (one was a black fine line pen and the others were brush-like ink pens in black, brown, green, and red). Then she was distracted by other things in her life and she hadn’t started her sketchbook by the time October came. She asked me if I would take over her sketchbook for free. I said yes and she gave me the sketchbook, the included ink pens, and her log-in information for the website.
Since I had already planned and started work on the bulk of the sketches for Inktober, I couldn’t begin work on this new sketchbook immediately. I decided to continue with my current sketchbook for the rest of Inktober then immediately switch to the new sketchbook after the month of October ended.
I finally took a look at The Sketchbook Project in early November and I saw that it had a February 1 deadline, which meant that I only had three months to fill it in then mail it to New York City. I hit upon an idea where I would do The Twelve Drawings of Christmas for the second year in a row while using this sketchbook for the drawings. (Which means that longtime readers of this blog will recognize at least half of the drawings in this post.) While I focused exclusively on winter/Christmas themes for the 2018 edition, for the 2019 edition I decided to include fewer Christmas-themed drawings since I was using a sketchbook that would ultimately be sent elsewhere and it would be looked at by other people (some of whom may not even celebrate Christmas at all) at other times of the year besides the winter holiday season.
I began doing the first of the drawings in this new sketchbook using the included pens only to discover that the paper was a bit on the thin side so the ink would bleed through to the other side. I initially thought about switching to just pencils so I could use both sides of each page but I only had three months to fill in this sketchbook before it was time for me to mail it back in and I had other things going on in my life so I really couldn’t devote 40-60 hours a week on this project.
So I came up with the idea of pasting my own photographs on the other side of each bled-through page once I finished with each ink drawing. Using photographs definitely cut the amount of work on that sketchbook since printing and gluing the photo on a page is way quicker than drawing. This sketchbook would highlight my talents as an artist and photographer just like this blog.
For the photographs I decided on a theme. This year is the 10th anniversary of this blog so I decided to use only those photos that I had previously highlighted in this blog. Despite putting that limitation on myself, I still had a challenge of sifting through hundreds of photographs from the last 10 years in order to decide which ones I would actually use. For every photo I decided to use, there were probably hundreds of others that I could have also used. I also made an effort to have a variety of photographs so I wouldn’t get pegged by others as being only a photojournalist or only a portrait photographer or only a nature photographer, etc.
Once I finished my sketchbook the first thing I did before I sent it back to New York City was to make a YouTube video. If you like to listen to music while viewing my work, here is the video.
If you prefer to viewing still photos, I’ll list them here in the order that they were placed in the sketchbook. Every drawing and photograph have previously been mentioned in this blog so I’ll provide a link to the post in case you want to read about the story behind each visual. (The link will open in a new window.)
OUTSIDE FRONT COVER

INSIDE FRONT COVER

PAGE 1: THE JOKER AND ARTHUR FLECK

PAGE 2: MADONNA GIRL DALE

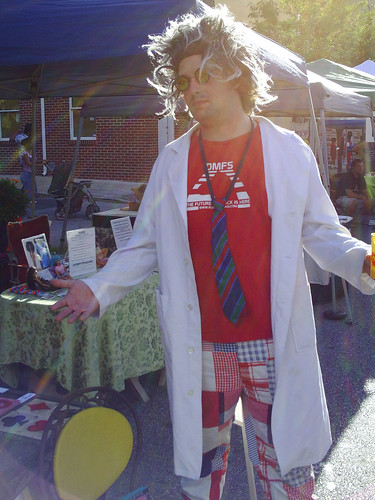
PAGE 3: A COSTUMED PERFORMER AT THE 2010 PIGTOWN FESTIVAL IN BALTIMORE
PAGE 4: HOWARD THE DUCK FAN ART

PAGE 5: MAKE AMERICA GREAT AGAIN

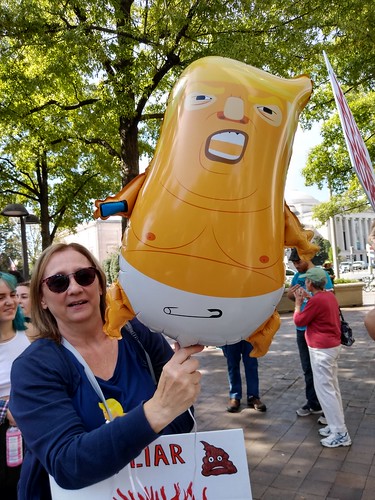
PAGE 6: CLIMATE STRIKE PROTESTER WITH TRUMP BABY BALLOON, SEPTEMBER 20, 2019
PAGE 7: BRUNI FROM FROZEN 2

PAGE 8: BLUE HERON IN PALMETTO, FLORIDA

PAGE 9: VOLKS DOLLFIE DREAM DOLL PEEKING FROM BEHIND CHERRY BLOSSOM TREE

PAGE 10: UNDER THE ZENTANGLE SEA

PAGE 11: BABY YODA IN MEAN CUTIES

PAGE 12: VOLKS DOLLFIE DREAM DOLL IN CHERRY BLOSSOM TREE

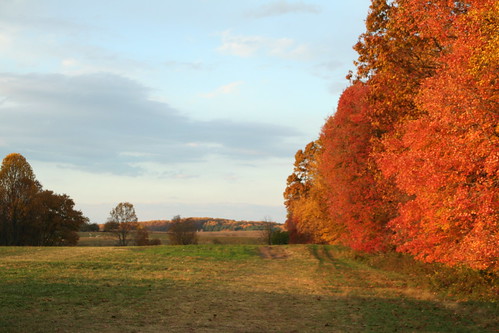
PAGE 13: FALL FOLIAGE AT CLARK’S ELIOAK FARM IN ELLICOTT CITY, MARYLAND
PAGE 14: HATSUNE MIKU AND THE CLAUSES

PAGE 15: A PENGUIN NATIVITY SCENE WITH LINUX

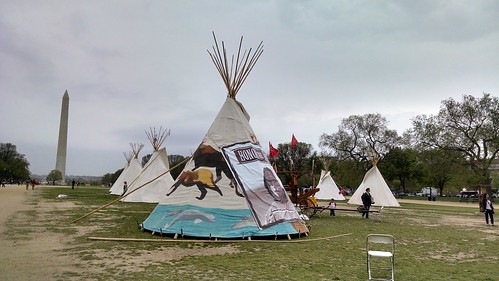
PAGE 16: 2014 COWBOY AND INDIAN ALLIANCE PROTEST AGAINST THE KEYSTONE XL PIPELINE
PAGE 17: COPS IN RIOT GEAR AT THE INNER HARBOR IN BALTIMORE DURING THE BALTIMORE UPRISING PROTESTING THE MURDER OF FREDDIE GRAY BY THE BALTIMORE CITY POLICE IN 2015

PAGE 18: UNITARIAN UNIVERSALIST FLAMING CHALICE

PAGE 19: ROSCOE THE ROOSTER MEMORIAL IN TAKOMA PARK, MARYLAND

PAGE 20: STATUE OUTSIDE OF ANN’S DARI-CREME IN GLEN BURNIE, MARYLAND

PAGE 21: BABY RAFAEL

PAGE 22: KRAMPUS TAKING DONALD TRUMP AWAY

PAGE 23: JOLENE SUGARBAKER

PAGE 24: COUNTER-PROTESTERS AT THE 2018 UNITE THE RIGHT 2 RALLY IN WASHINGTON, DC

PAGE 25: THE MAY DAY 2015 PROTEST AGAINST THE KILLING OF FREDDIE GRAY BY THE BALTIMORE CITY POLICE AT THE INNER HARBOR IN BALTIMORE

PAGE 26: EDGAR ALLAN POE AND THE RAVEN

PAGE 27: UNDER THE ORANGE SKY

PAGE 28: OCCUPY DC (PART OF THE LARGER OCCUPY WALL STREET MOVEMENT), MCPHERSON SQUARE, WASHINGTON, DC, NOVEMBER 5, 2011

PAGE 29: BUTTERFLY ON A FLOWER AT BROOKSIDE GARDENS IN WHEATON, MARYLAND

PAGE 30: DONALD TRUMP AND HARLEY QUINN

PAGE 31: COBB ISLAND, MARYLAND

PAGE 32: RAINBOW OVER NORTH BEACH, MARYLAND, SEPTEMBER 12, 2019

INSIDE BACK COVER

OUTSIDE BACK COVER

I felt a really great achievement in finishing this. There was a part of me that felt sorry that I had to mail it to New York City but that’s the way it goes. In a way working on this project is like having a child. You nuture it and make your own imprint on it but ultimately you have to let it go out into the wider world on its own as a completely independent entity. I don’t know if I’ll ever see my sketchbook again in person (let alone actually hold it in my hands one more time) but it was time for me to let go of it. At least I shot enough pictures and video footage so I can at least look at it again if I ever begin to feel sad over no longer having that sketchbook in my possession.
Yesterday I received an email from The Sketchbook Project informing me that my sketchbook has been assigned a new call number:
383.10-4
So if anyone ever goes to the Brooklyn Art Library and wants to see my sketchbook in person, you now know how to look for it.
From time to time I’ll probably log into the official website to see if anyone has checked it out or if the Brooklyn Art Library has sent it out on a road trip of some sort. It would interesting to see in the future whatever happened to that sketchbook. But right now I’m going to move on from that project and focus on other things in my life that needs attending to.
![]()


I decided to draw a flaming chalice, which is a symbol of the Unitarian Universalist faith. This drawing is based on a chalice that my church has. I went to church on my birthday (December 15), which also falls on a Sunday this year. I sat close enough to the front that I was able to draw it during parts of the service where we weren’t singing hymns. I decided to upload this drawing today because today is Sunday and I’m usually at church on Sundays.
![]()
I currently have a work of art on display at the latest artist exhibition that’s currently going on at Paint Branch Unitarian Universalist Church in Adelphi, Maryland. Here’s is my piece.

Here is my piece as it is currently displayed inside of the church.

To learn more about how I created this piece, you can see the blog post I wrote on September 12, 2018.
After service last Sunday there was a reception for this exhibit where they basically served light food like baba ganoush with crackers along with fruit and vegetables. Here are a couple photos I took of the reception.


The art show is continuing through sometime next month. (I’m not sure of the date but I’ll definitely post it here when I get more information.) For more information about this exhibit, see the official website.
![]()
I did a digital art piece that’s now hanging in my church as part of the Seven UU Principals art show. Here’s the art.
I did the piece entirely in Adobe Photoshop. It’s the image of the flaming chalice being surrounded by a circle, which is a symbol of the Unitarian Universalist faith. I decided to try using words to create a picture instead of just doing a regular drawing. The flame is the only part where I did a regular digital drawing instead of using words (although I drew a red heart in the center of the flame).
As for the color scheme I used the traditional yellow and red for the flame. For everywhere else I used a rainbow color scheme to symbolize both the UU and Poor People’s Campaign acceptance of everyone regardless of race, ethnicity, sexual orientation, gender (including gender identity), class, age, physical health, mental health, and other categories that people in power like to categorize people in.
As for the words I used lyrics from two songs that are among the official songs of the Poor People’s Campaign. The circle uses lyrics from this song, “Everybody’s Got a Right to Live.”
The chalice itself has the words from “A New Unsettling Force.”
With this art I attempted to do a Unitarian Universalist variation on the Poor People’s Campaign and I think I succeeded.
![]()

Today is the day after Halloween and the first day of the two-day Mexican holiday known as El Día De Los Muertos (Day of the Dead). In addition, Inktober officially ended right on Halloween yesterday. I succeeded in drawing and uploading 31 ink drawings in 31 days from October 1-31. I finished Inktober at the same time as I ended up getting sick with this stomach flu where I constantly felt nauseous and I alternated between going through dry heaves and diarrhea. The fact that it also happened on the same day as Halloween totally sucks. I barely managed to get myself together enough to give out treats to the trick or treaters. Instead of going to a Halloween night party at a friend’s house, I had to make an emergency run to Giant after the official trick or treat time ended just so I could pick up some medication and toilet paper.
Today I feel better in that the dry heaves and diarrhea has subsided and I feel mostly tired. I took a nap today and I’ll probably go to bed early tonight so I can rest some more.
As I go over the drawings I did during the month, I realized that I could easily put them into certain categories (with many of those drawings falling under more than one category).
Animals: Penguin, panda bear, black cat, dinosaur, swan, pig, two former ride cars from the now-defunct Enchanted Forest amusement park shaped like a duckling and a swan, Willie the Whale, goat, and Zombie Dog.
Based on Dolls I Currently Own: Volks Dollfie Dream, Batgirl and Wonder Woman (with Donald Trump and by themselves).
Building: Crooked House.
Clark’s Elioak Farm: Two former ride cars from the now-defunct Enchanted Forest shaped like a duckling and a swan, the Crooked House, Willie the Whale, goat.
Death Penalty: Guillotine.
Friday the 13th: Black cat.
Halloween/Day of the Dead: The Wicked Witch of the West from The Wizard of Oz, Goat Man, Zombie Dog, Day of the Dead skeleton, Frankenstein, Jack O’Lantern.
Hollywood Scandal: Harvey Weinstein.
My Own 100% Original Character: Zombie Dog.
Native American (For Indigenous Peoples Day a.k.a. Columbus Day): Wolf kachina.
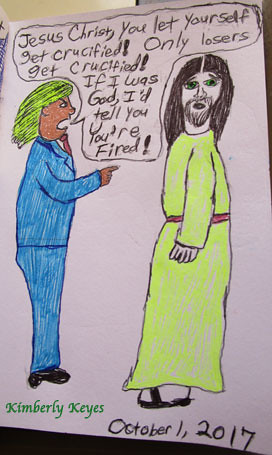
Real People: Donald Trump with Jesus Christ, Donald Trump again (with Wonder Woman and Batgirl), Donald Trump yet again, Donald Trump one more time, Tom Petty, burlesque performer Reverend Valentine, Harvey Weinstein, my father-in-law, my mother (which also includes Elvis Presley), Madonna Girl Dale.
Religious-Related Drawings: Jesus Christ (with Donald Trump), Unitarian Universalist flaming chalice, wolf kachina.
People Who Celebrated a Birthday During Inktober: My mother.
People Who Died During Inktober: Tom Petty and my father-in-law.
Politics: Donald Trump with Jesus Christ, Donald Trump again (with Wonder Woman and Batgirl), Donald Trump yet again, Donald Trump one more time.
Relatives: My father-in-law and mother.
Superheroes: Batgirl and Wonder Woman together with Donald Trump and by themselves.
Supernatural Book/Movie Characters: The Wicked Witch of the West from The Wizard of Oz and Frankenstein.
Virtual Models from Figurosity.com: Woman running with a gun, woman dressed in psychedelic tye-dye outfit holding a gun.
The biggest challenge for me is that working on a new drawing a day then uploading it online to this blog and various social media sites took a portion of my time that I could’ve spent doing other things (such as doing house cleaning, putting up Halloween decorations, sending out a few more resumes). That was the main reason why I had quit a previous effort to do one new drawing per day starting on January 1, 2016 (which was a New Year’s resolution). I think the reason why I was more successful at Inktober than my previous daily drawing effort last year was because I knew it was only for 31 days that I had to worry about doing a new drawing each day. After that I could draw as much or as little as I wanted.
Even though there was an official Inktober prompt list of one word for each different day, I was more interested in doing my own thing since this is the first year I participated in this. (Inktober has been going on since 2009.) I only used the official prompt list if I was stumped for inspiration. Now that I got my desire to draw whatever I wanted for Inktober out of my system, I’m thinking that if I was to do this again next year, I would discipline myself by sticking strictly with the prompt list. It would be a way to challenge myself, especially since I’m sure that there will be a word or two that will have me totally stumped at first.
The biggest benefit I got from Inktober is that I was able to learn which social media sites gave me the best exposure in terms of publicizing myself and my work. I uploaded my drawings to the current popular social media accounts (Facebook, Instagram, and Twitter) as well as other social media sites I haven’t posted anything in a while. These sites used to be relatively popular until they were overshadowed by Facebook/Instagram/Twitter. I decided to upload to them because I wanted to see if I should still bother with them. I found that the absolute worst were Flickr and Google+ because I only got one “Like” on both platforms and that was it. Tumblr was hit or miss in that I got maybe one or two Notes (which is Tumblr’s version of “Like”) for some of my drawings but there were others that got zero Notes. (The one drawing that got the most attention was the one I did of Tom Petty and that one only got four Notes.) Minds, the open source alternative social media site, was just as hit or miss as Tumblr in that I got maybe one or two “Likes” on some drawings but others were totally ignored.
By far the best response I got was on this blog and Instagram. In fact I got new followers on both platforms because of Inktober. Twitter came in at a close second in that I also got new followers as well as retweets. Facebook was surprisingly more of a mixed-bag. While I got a better response than Flickr, Google+, Tumblr, and Minds combined, the response rate was lower than this blog, Instagram, and Twitter.
The one major social media site that I didn’t use was LinkedIn because that one is more of a professional social media site and some of my drawings were either too political (such as the ones featuring Donald Trump) or the subject matter was one where I just didn’t feel comfortable in posting there (such as the one about the Harvey Weinstein action figure). I’ve seen people get chewed out on LinkedIn for posting anything that was even remotely controversial (especially one that’s political) and I’d rather avoid it since it’s common knowledge that would-be employers tend to look you up on LinkedIn to see if you’re someone they would even want to hire. I don’t want to lose out on any potential opportunity because of some post I made there.
It was time consuming to upload the same drawing on so many different social media sites per day but at least I gained knowledge on which ones are worth investing my time in promoting myself in the future so it was worth it in the end.
I also learned that there is certain value in practicing drawing only for yourself because you’ll never know when one of those drawings you’ve done have struck inspiration to do a regular art project based on what you’ve drawn. I’m thinking about doing a watercolor version of that swan I drew during Inktober because I really liked the results.
Another positive result of Inktober is that I discovered Figurosity.com and that site was valuable in providing virtual models for me to practice my drawing with. I plan to use that site for my drawing more often.
I also looked at other people’s Inktober drawings on social media and I was amazed by the amount of creativity I saw there. There were a few people who did some really ambitious things for Inktober. I saw some people do two or more drawings per day, which I personally admired since I found it a challenge to do even one new drawing in a small sketchbook every single day. I saw one guy who was working on a graphic novel and he decided to use Inktober to draw and ink one new page per day. There was another person who decided to use Inktober do a large complex drawing where the person inked just one section of that drawing each day with the goal being that the large complex drawing would be completed on October 31.
The biggest challenge with Inktober is to maintain my enthusiasm for continuing with drawing one new drawing per day then uploading it online. The first few days I was very eager and enthusiastic. But then I came down with this nasty cold but I continued to work through that cold even though my body wanted to get more sleep so it can knock off those cold germs. After I got rid of that cold I began to gradually view the daily Inktober sketches more and more as some time-consuming daily chore instead of something that I was excited and enthusiastic about. Even though I tried to keep the designs relatively simple and I used a small sketchpad, I still found myself burning out towards the end. This was especially true when I wanted to put up Halloween decorations or go to some Halloween-related local event only to remind myself that I needed to make time for my daily Inktober drawings.
By the last week I went to Clark’s Elioak Farm because I wanted to draw enough pencil sketches so I could just ink over them on the allotted day for the next few days. Then I spent one additional evening filling up my sketchbook with enough Halloween-themed pencil sketches to last me until the very end of the month.
But then I began to just burn out on even doing the ink over the pencil outlines, especially during that last weekend before Halloween. I started to partially-ink over more than one pencil sketch a day or two before the allotted date while leaving each one intentionally unfinished until the allotted date, when I would finish it so I could technically say that I did work on one new drawing per day each day during Inktober. One evening, about two nights before the end of Inktober, I used my free time to do the bulk of the inking on my scheduled drawings of the last two days while leaving just a small area of each drawing unfinished so I could spend less than 15 minutes completing each drawing on the allotted day.
I did it this way because I grew tired of spending anywhere from a half-an-hour to a full hour working on each new drawing then spending additional time photographing my drawing then uploading it on my various social media accounts. You may think that I was cheating but I don’t care. If I hadn’t done something like this, I would’ve grown so tired of spending a chunk of time on my Inktober sketch that I would’ve quit just days before October 31.
Right now I’m typing this in the early days of NaNoWriMo, which is something similar to Inktober where you spend every day in November writing your novel. I’ve read about people who are doing NaNoWriMo but I’m definitely not taking part in this. Spending time each day doing Inktober was enough for me without having to go from doing daily Inktober drawings in October to writing daily NaNoWriMo prose in November.
Now that Inktober is over, I’m going to take some time off from drawing on a daily basis because I have other things in my life that I need to focus on (such as the upcoming winter holidays in December). Ultimately I’m going to try doing a new drawing in my sketchbook at least once a month. I would do this by just working on that drawing in blocks of 15 minutes on a given day (and that would be only if I had extra time available for me to do such a drawing). I would keep on working on the same drawing, 15 minutes at a time and one day at a time, until I’m finished. Basically I want to practice my drawing but on a more leisurely schedule where I can balance that with other activities that require my attention at the same time.
Of course only time will tell whether I actually achieve this. (LOL!) But I’m willing to at least give it a try.
Here are a few things I would advise a person who’s thinking about doing either Inktober next year or simply wants to devote a different month to doing one drawing per day (such as December or March or June):
1. Don’t obsess too much about drawing supplies. I know the official Inktober site has a list of recommended supplies but some of these supplies (such as Micron pens) can be pretty expensive to those on a tight budget. If you can’t afford the recommended Inktober supplies, don’t fret. Just go with cheaper supplies instead. I did my Inktober drawings using a cheap pack of multicolored Paper Mate InkJoy pens that I purchased at Target for only $10. And I wasn’t the only one who didn’t use the best supplies either. I saw quite a few Inktober drawings that were done only with the cheap disposable blue ink Bic ballpoint pens and I found them to be just as interesting and well-done as the ones that were used with the more expensive pens. As for drawing paper, I would recommend shopping around because sometimes you can find the best bargains. Here’s one example: I’ve seen 9” x 12” (23 cm x 30 cm) sketchbook drawing pads on sale at my local Five Below store for only $5.
2. Use a small sketchbook that’s no bigger than 9” x 12” (23 cm x 30 cm). Not only will you fill up the page faster than with a larger sketchbook but a smaller sketchbook is more portable. I did my Inktober drawings using a 4” x 6” (10 cm x 15 cm) sketchbook. When I decided to travel to Clark’s Elioak Farm to do some more Inktober drawings, all I had to do was to put my sketchbook (along with my pens and pencils) in my purse and I was good to go. Heck, I saw some Inktober sketches online that were drawn on Post-It Notes.
3. If you can, try setting aside a certain time each day to work on your Inktober sketch. It could be when you wake up the first thing in the morning or after dinner or whenever. If you can’t commit to the same time every day, then just take advantage of whatever free time suddenly materializes to do your drawings. I’ve seen people admit that they did their Inktober sketches while riding public transportation on the way to or from their day jobs. I’ve even seen people admit that they did their drawings on the sly while being forced to sit in on a boring lecture at school or they took advantage of some downtime at work. Just do whatever works for you.
4. The one thing about Inktober I learned is that you can do some advance drawings in pencil as long as you wait until the designated day to do the final inking. In fact, I learned that this year’s official Inktober prompt list was put online two weeks before the month began so one could have the luxury to decide what he/she wanted to draw on the designated day and even do a rough sketch in pencil. I took advantage of this policy towards the end of the month when I began to burn out on doing a new drawing every day and I was in danger of quitting before the month was over. What I did was to go to Clark’s Elioak Farm, where I finished one new drawing in ink but I did other unfinished drawings in pencil that I could finish in ink over the next few days. By the time I finished that series, it was close to Halloween so I spent one evening just doing a pencil drawing of Madonna Girl Dale (who usually wears a costume in public all year round) followed by pencil drawings of traditional Halloween and Day of the Dead figures until the 31st drawing of the month. So I spent the last week of Inktober just coloring in one previously made pencil drawing in ink per day until I reached the last drawing on Halloween.
5. If you hit a rough patch where you really can’t focus on doing any complicated detailed drawings or you don’t have a lot of time to do anything too complex, just do a simple drawing that you can easily finish in 30 minutes or less. I experienced this challenge earlier this month when I came down with this horrible cold that literally left me feeling very weak and tired all the time. For those days I decided to do simple drawings of a penguin and a panda bear because those animals were relatively easy for me to draw quickly before I felt tired enough to take another nap. As an added bonus, those two drawings were basically black and white drawings so I didn’t have to do much thinking while I drew them. I also didn’t bother with drawing backgrounds because that would’ve been more time-consuming and I didn’t feel wide awake enough to draw something that would’ve been more complex.
6. Don’t be a perfectionist about your drawing. The whole purpose of Inktober is to practice your drawing, not focusing on being the next Rembrandt or Keith Haring. The idea is to do a quick drawing that can be done in a small part of your day.
7. Don’t be afraid of posting your drawings online, even if you personally feel less than enthusiastic about your latest drawing. I found that people tended to be really nice towards those who posted their Inktober drawings and many of them gave positive feedback. I personally didn’t encounter any cyberbullying in the month that I posted my Inktober drawings online. Just post your drawing online even if you personally don’t like it because there will be people who will like it better than you do.
Well, that’s it for Inktober 2017. I’ll end this post with a couple of embedded things in case you’ve missed some or all of the Inktober drawings I’ve been uploading over the past month. One is a YouTube video that includes some catchy background music.
If you prefer to view the pictures at your own pace without background music, you can view my Flickr album instead.
Despite being sick with a cold over the last few days, I’ve done a far better job at keeping up with this Inktober stuff than I did last year when I made my New Year’s resolution to do one new sketch drawing per day.
I attend a Unitarian Universalist church. Today I felt well enough to go to church this morning. I arrived at Paint Branch Unitarian Universalist Church (PBUUC) in Adelphi, Maryland and I found a seat in the front row. I brought my sketch pad, pencils, and pens with me so I was able to sketch PBUUC’s flaming chalice while I was listening to today’s sermon on “Unpacking White Supremacy: Going behind the language to greater understanding.” Yeah, I was multitasking but I managed to successful at achieving both. The service was excellent and emotional, especially when a portion of the service was devoted to those who were brutally murdered in that horrible Las Vegas rampage because today is the one-week anniversary of that horror.

Click here if you want to learn more about the importance of the flaming chalice in Unitarian Universalism.


For the past month or so I’ve spent a lot of time working on this bag. It will be up for bids at my Unitarian Universalist congregation’s annual auction this Saturday, November 10, starting at 4 p.m. Bidding will be done in person only—there will be no online or phone auctions. If you’re interested in buying this bag and you live in the Baltimore-Washington, DC area, click here for directions on how to get to the church.
Here’s some background information about the origins of this bag. In the first couple of weeks after I underwent my hip surgery last September, my husband initially drove me to and from physical therapy. But when his leave time was up and he had to return to work, I still needed to be driven to and from physical therapy because I hadn’t been cleared by the doctor to resume driving. Members of my UU congregation volunteered to take me to and from physical therapy, which was really awesome. (There was only one friend who wasn’t a member of my congregation who spent one day driving me because there weren’t any members available who could take me that day. This friend is now dating my husband. Yes, my life has gotten that weird.)
Ever since my husband suddenly walked out on me with no advanced warning three days after Christmas last year, members of my UU congregation have reached out to me and helped me out. One day I even had congregation members help me with some of the heavy yard work and doing the internal housework and decluttering.
I really wanted to show my appreciation to my congregation but my finances are a bit too tight these days for me to leave a very generous donation. When the annual fundraising auction was coming up, I decided to do the next best thing: Design a bag to be sold at the auction. One hundred percent of the proceeds raised will go to the congregation to help it pay bills so it could remain in operation.
Here is how I decided on customizing a reusable shopping bag. Our faith has seven principles with one of them being "Respect for the interdependent web of all existence of which we are a part." For many years my congregation has long been in tune with nature and the original founding members of the congregation picked our current location by looking for the most wooded property that they could afford to purchase. Our congregation started to recycle paper and plastic but then it began to move beyond this simple act. For church dinners our congregation uses china and silverware instead of disposable paper plates and plastic forks/knives/spoons. For the post-Sunday service social time, our congregation has switched from disposable styrofoam cups to regular coffee mugs. When one of our buildings caught fire due to faulty wiring and we had to rebuild the damaged inside, one member was so insistent that a geothermal system gets included in rebuilding the interior that she actually took the initiative to contact a local geothermal contractor. When the UUA announced its new environmentally-themed certification program for its member congregations called the Green Sanctuary, our congregation formed a Green Team who spent a lot of time doing activities so our congregation would get that certification. More recently our congregation is currently striving to rid the property of invasive non-native plants that have taken root there because non-native plants have this ability to drive out native plants. Not only is our congregation committed on this green path, there are many members who, in their private lives, are striving to consume as little as possible to the extent where they will even bring their own reusable bags to the store when they go shopping so they won’t have to use plastic bags.
Against this backdrop, I figured that customizing a reusable shopping bag customized with UU symbols against a Zentangle background would be a big hit at this Saturday’s auction. I had previously customized bags in the months before my hip surgery last September (click here, here, and here) so I know I could do it again.
I started my project by going to Michaels Arts & Crafts and buying a large sized blank canvas bag. Then I searched through my collection of UU chalice clip art that I downloaded for free from the UUA’s website until I found one that I liked. I enlarged the clip art in Adobe Photoshop until it was large enough to be visible on the bag then printed it out. Using a pencil and graphite paper, I transferred the chalice design to the canvas bag. Afterwards I drew the Zentangle strings (a Zentangle term for borders) on both sides then I gathered my pencil and acrylic paints and began my project.
I hadn’t customized a bag in nearly a year so I had forgotten how time consuming drawing and painting Zentangles over a large area of the canvas can be. The biggest mistake I made was in time management. If I had to do this again, I would’ve purchased the bag in June or July and worked on it an hour or two a week so I could balance my work on this project with other things going on in my life. Unfortunately I dawdled and I didn’t get around to buying the bag until late September or early October and, as I worked on this bag, I realized that I had to devote a huge chunk of my free time if I wanted to finish this projet on time. As a result I’m currently going through back issues of newspapers that I had let piled up because I was so busy working on this bag. I started to burn out on working on this bag so much. I had spent so much time on this bag that I would wake up exhausted the next morning after working on it up until I was tired enough to go to bed. At least I finally finished it just six days before Auction Night.
I mixed the acrylic paint on both sides with a fluid medium in order to thin the paint prior to painting it on the bag. It made the surface of the bag much smoother with fewer lumps. After I finished painting, I covered both sides with four coats of clear varnish to both seal the paint job and to protect it against the outdoor elements (especially since it’s going to be used as a shopping bag or tote bag). During the painting process I found that working on each side of the bag had its own challenges that I didn’t forsee in advance so it increased the stress that I was under to finish the bag on time.

For this side I had envisioned a flaming chalice (symbol of the Unitarian Universalist faith) against a Zentangle background that would be done using the seven rainbow colors plus brown (since I had drawn a radial string that divided the background into eight sections). I did the chalice itself in black in order to distinguish it from the background. I carefully placed the lighter background colors towards the bottom area so they wouldn’t blend in with the flame. I did the circle in gold so it would stand out against the background. Once I finished with underpainting the entire flaming chalice symbol, I added a layer of glitter paint on top so the foreground elements would further stand out.
I didn’t add glitter paint to the background because I wanted to provide a contrast with the foreground. When it came time to selecting the colors, I made sure to select a yellow paint color that wouldn’t blend in with the gold circle in the foreground and wouldn’t blend in with the original canvas color of the bag. So I ended up with using dark yellow.
The only major challenge came with red and brown. I originally used a dark red paint and found that if you viewed the bag from a distance, it looked like the dark red was blending in with the brown next to it so it looked like I had painted one large area the same color. I ended up repainting the red area using crimson paint, which produces a brighter red color. Repainting one area was a bit of a hassle but that was nothing compared with the challenges I faced on the other side.

I originally had the idea of writing all seven UU principles against a Zentangle background. I saw some examples in the Zentangle books I have of letters combined with Zentangle backgrounds and I thought they looked neat. When I found that the other side was very time consuming, I altered the design by having the seven principles superimposed over another flaming chalice that would exist as negative space and would, in turn, be superimposed over the Zentangle background. I figured that having a negative space flaming chalice would save time on painting.
While the other side had the foreground elements covered in basic colors (black chalice base, gold circle, and yellow and orange flame) painted over with glitter paint against a multi-colored Zentangle background, for this side I thought of something different. I used the seven rainbow colors plus brown for the lettering, which was then painted over with glittered paint. The negative space flaming chalice would be kept blank (which is why it’s called "negative space".) The Zentangle background would be done in black paint with no glitter in order to disinguish it from the foreground letters.
So I typed and formatted the seven UU principles in Adobe Photoshop and enlarged it until it was the right size for a large bag. I printed it out and transferred it to the canvas bag using a pencil and graphite paper. I reused the enlarged chalice clip art from the other side and drew that on the bag with pencil and graphite paper. Then I drew the Zentangle strings with a pencil, which divided the background of the bag into different sections and began to paint.
As I kept on painting, I found, to my horror, that the multi-colored lettering seemed to blend in with the Zentangle patterns. I took another look in my Zentangle books at the examples of having letters against a Zentangle background and I found that the larger letters were the ones that were used in such a situation. In the examples I saw where smaller letters were used, there was frequently a white space where the small letters went and the white space was surrounded by a Zentangle background. No Zentangle pattern touched small letters. I now understand why that is so.
So I fixed the situation by taking a tube of parchment colored paint that I happened to have among my collection of paints (the parchment colored paint is among the more unusual paint colors I have) and painting around the small letters so it’ll look like the sayings were painted on tiny slips of paper that were superimposed over a negative space chalice and Zentangle background. That seemed to fix the problem.
There was one snag in using the parchment colored paint. The light blue I used for the one of the UU principles seemed to blend in with the parchment background. So I fixed it by painting the whole principle over again with a darker shade of blue then re-painted the glitter paint on top.
As for the Zentangle patterns on both sides, I basically used the patterns that were in my Zentangle books and posted on the TanglePatterns website, which has literally hundreds of patterns to choose from and new ones are being uploaded all the time.
If you’ve read this far and don’t feel like scrolling back to the beginning to learn how you can own this bag, I’ll repost the information right here. It will be up for bids at my Unitarian Universalist congregation’s annual auction this Saturday, November 10, starting at 4 p.m. Bidding will be done in person only—there will be no online or phone auctions. If you’re interested in buying this bag and you live in the Baltimore-Washington, DC area, click here for directions on how to get to the church.
For years I’ve heard of figurines known alternatively as "designer toys" or "urban toys". (For simplicity purposes, I’m going to follow what the Wikipedia does and refer to them as designer toys.) I used to see them on sale in the now-defunct Tower Records stores and I see them from time to time in chain stores like Hot Topic and Spencer’s and in small locally-owned botiques.
When I visited Walt Disney World during my trip to Florida last month, I found out that even Disney has jumped into the designer toy fray. Many of their gift shops sold a line of Mickeys known as Vinylmation. These Mickeys come in both 3-inch and 9-inch models and they come in a variety of colors and designs.
I also saw a line of blank Mickeys on sale for those who want to try their hand at designing one. I also saw stickers and glitter sold separately that one can use to decorate the blank Mickeys with. I decided to purchase a blank 3-inch Mickey and a sheet of stickers. Here is what the Mickey originally looked like.


Once I returned back to Maryland, I started to play around with designing Mickey. I became influenced by another souvenier from Walt Disney World which was a pin of a rainbow flag shaped like Mickey’s head. I thought it was such an incredible find that I wore it to Sunday services at my Unitarian Universalist congregation where I got praises for it. I became influenced by a pair of angel wings that were printed among the sheet of stickers I purchased at Disney World. Then I remembered how my congregation has been enthusiastically supporting the Unitarian Universalist Association‘s "Standing on the Side of Love" campaign so I did this design for my blank Mickey.
To make him sparkle brightly, I mixed in glitter powder with acrylic paint before I painted it on Mickey’s shorts, legs, gloves, nose, and head. I used metallic paint for the shirt and shoes. Once I finished with the paint and stickers, I used glossy acrlic gel to seal the work. Then I used a matte varnish to seal the entire job. I took a few pictures outside in the sun in an effort to show how shiny and glittery Mickey is.


I also took a few more shots of Mickey in a more shaded area so you can get a better glimpse of his colors. The hearts you see on his shirt and on each ear is based upon clip art that was originally created by Sean Bolton. (The design is a heart-shaped variation of the flaming chalice, which is a symbol of the Unitarian Universalist faith.) I’m thinking about offering this one up for sale in my congregation’s annual auction later this year.


I could’ve gone further with my blank Mickey by doing things like painting his head in an entirely different color but I went conservative and based Mickey’s head on the numerous Mickey variations that Disney has done over the years because I don’t want to turn off anyone from bidding on this little fellow in the auction. All in all I had a good time with customizing that little fellow.

You must be logged in to post a comment.